Introduction to Terraform
Using a three tier architecture analogy to understand how Terraform works
Terraform is a Hashicorp product ecosystem for managing technology infrastructure. It comprises of the following:
An infrastructure configuration language (HCL).
A compiled binary (Terraform Core) that executes infrastructure configuration modules written in the infrastructure configuration language.
Plugins (Terraform Providers) that integrate with the compiled binary to target a wide variety of private/public cloud platforms such as AWS, Azure, GCP, vxRail etc.
A set of reusable libraries (Terraform Modules) that can simplify and often hasten the process of creating well-architected infrastructure.
Additional tooling from Hashicorp, such as Terraform Enterprise and from partners such as Gruntwork (Terragrunt) that augment open source tooling to bring Terraform ecosystem to enterprises.
More importantly, a framework of ideas and knowledge base, that one can learn and borrow from in one's own journey in managing technology infrastructure at scale.
To simplify learning Terraform, we present the main ideas of the ecosystem by overlaying them on a traditional three-tier architecture.
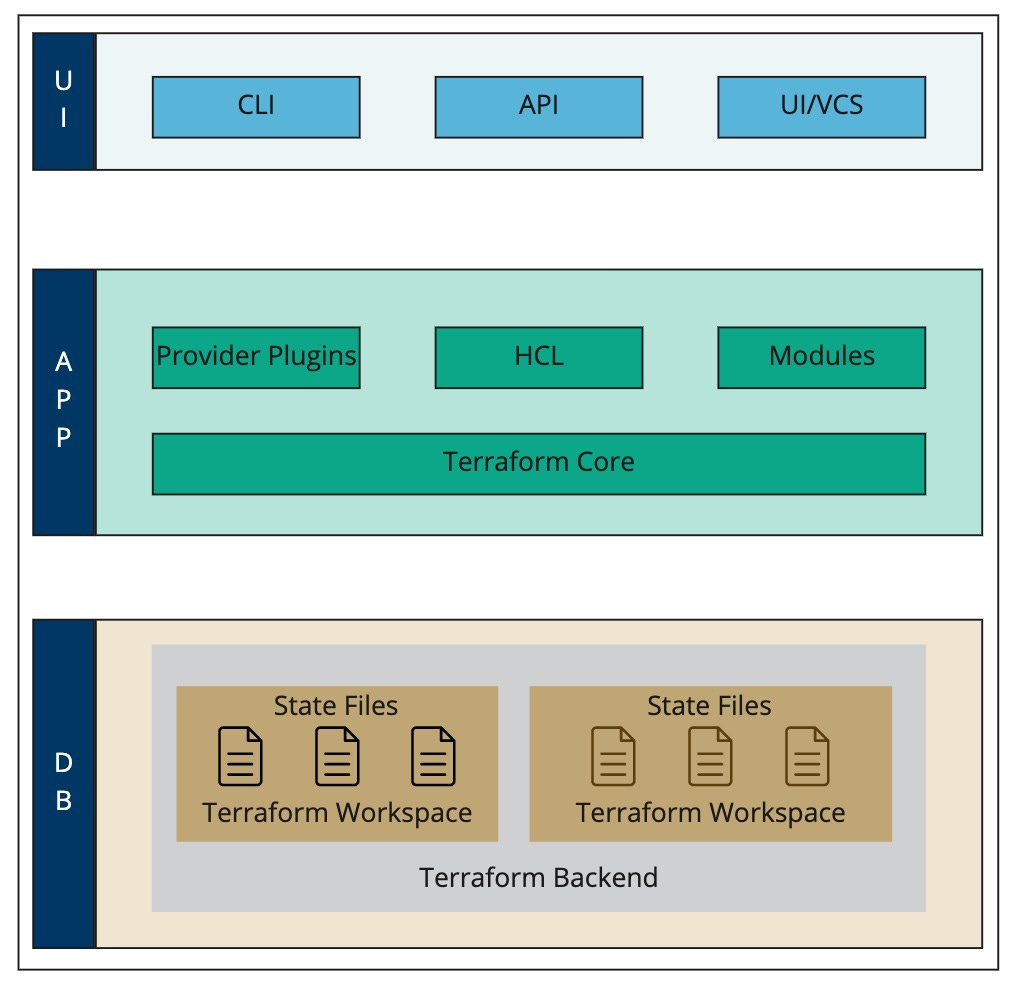
Let us start our investigation with the Data Tier.
Terraform stores Terraform State in the data tier. State can be described as a serialized representation of infrastructure that is currently under management.
Terraform state is stored in files with .tfstate extension. These files are JSON documents. A documentation of the format specification is available here.
Terraform Workspaces are a good way to partition work using Terraform. These partitions can be used to handle a variety of situations. Workspaces can be used to isolate environments such as dev, test, prod etc. They can alternatively be used to partition different projects that might be ongoing at any one time. One might at the simplest level use them to organize work with Terraform so as to allow for experimentation.
Terraform State files are stored in Terraform workspaces. Thus, making each Terraform workspace its own isolated working area. Default Workspace must receive a special mention here. It is the workspace that always exists. It cannot be removed. If one does not explicitly create and specify a workspace, then the default workspace is assumed.
Terraform workspaces are stored and modified in a Terraform Backend. This backend can be local or remote, just like any other database such as mysql or oracle can be. Terraform supports a variety of remote backends. The list of remote backends can be browsed through here.
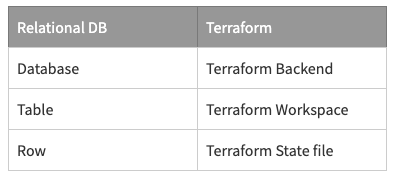
A simple relational database analogy provided in the table below can be used to understand the relationship between Terraform State, Workspaces and Backend.
Let us now shift our attention to the presentation tier.
Terraform when installed comes with the CLI tooling. Most books, articles on Terraform use the CLI toolset to make their case.
Terraform has a RESTful API frontend as well. However, it is only available with the Hashicorp's Terraform cloud commercial offering. A subset of operations that can be performed through the CLI are exposed via the Terraform API.
Enterprises can leverage the Terraform Cloud API layer to build custom developer experiences for their internal audience.
There is also a UI and a methodology to plugin and use version control systems such as github. This is again however available in the paid version of the product.
The documentation for the CLI is available here.
The best way to understand the application tier of Terraform is to engage in creation of some actual infrastructure using the toolset. Let’s get to writing our first Terraform module. It is presented in a tutorial form. You may choose to follow along.
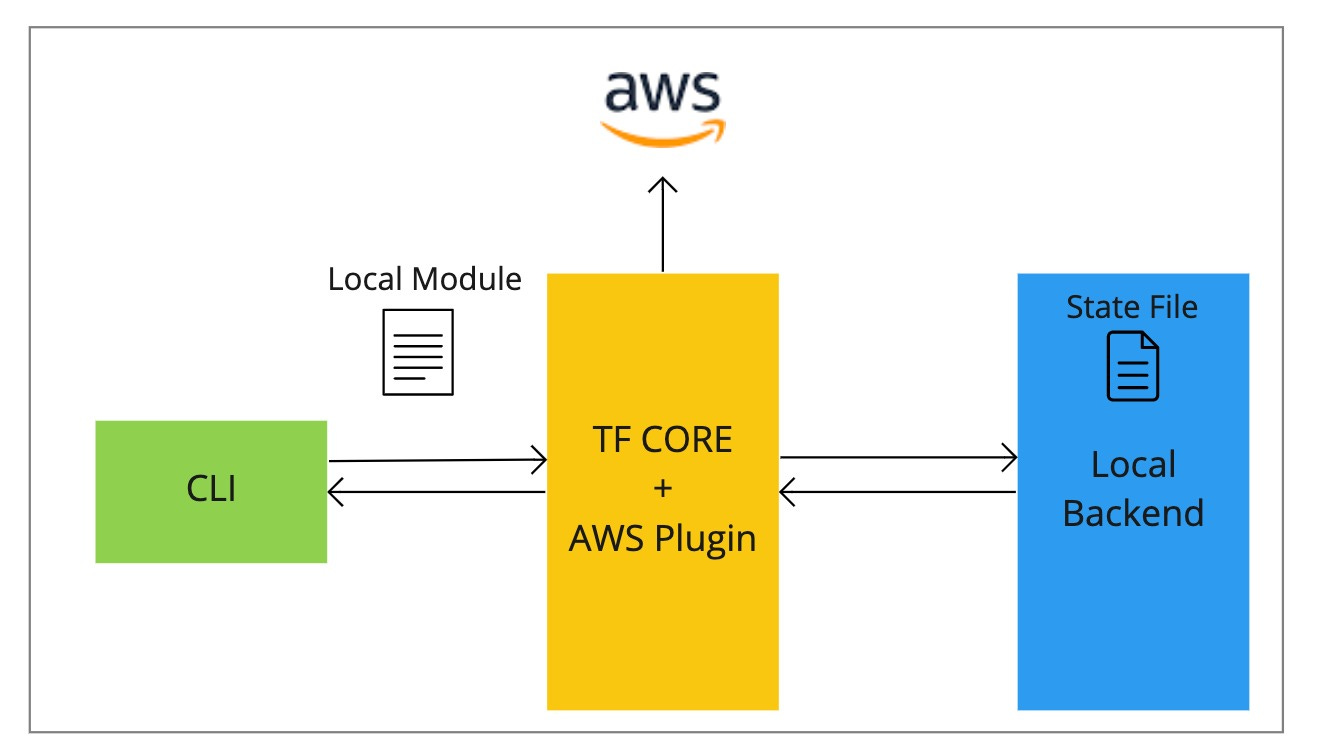
Download Terraform and install. The installation brings the terraform binary (Terraform Core), the Terraform CLI and the facilities needed to use local backend for managing infrastructure. Thus, we have all the three tiers of Terraform ecosystem locally available.
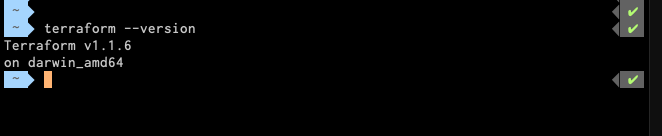
If you are on a Mac, run the below command on the terminal.
brew install hashicorp/tap/terraformLet us check whether the installation ran successfully using the below.
terraform --versionOn my desktop the output looks as shown below. This signals that installation was successful.
Let us now create an Amazon EC2 instance using Terraform. To do this, we need to write some infrastructure configuration using HCL. Create a new project directory.
mkdir intro-to-tfcd intro-to-tf
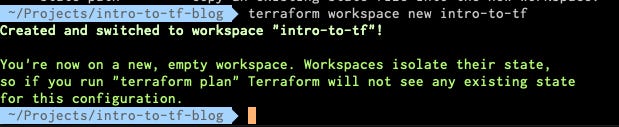
Let us create a new Terraform workspace. This will hold the state files related to the infrastructure that we are about to create. The below command will create a new terraform workspace and set this new workspace as our current workspace.
terraform workspace new intro-to-tfYou should see a command response that looks like the below.
Create a file main.tf at the root folder. The .tf extension indicates that this file holds infrastructure configuration written in Terraform’s HCL. Everything in Terraform is a module. The code that we would write in main.tf actually results in creation of local module. One can think of a module akin to a function in an programming language such as python, C etc.
Since, we are creating infrastructure against AWS, we have to supplement Terraform Core with the appropriate AWS provider plugin. This plugin will augment the feature set of Terraform to support constructs that will enable the management of AWS infrastructure.
Add the following lines of code to the main.tf file that you have created earlier. Please key in the appropriate AWS Access Key and Secret Key. The approach shown below is for illustration only. For all practical purposes however, care must be taken to not share AWS secrets broadly. There are other methods to inject these secrets via environmental variables, shared config files, secret stores etc. Please refer to documentation here on this subject.
provider "aws" {region = "us-east-2"access_key = "my-access-key"secret_key = "my-secret-key"}
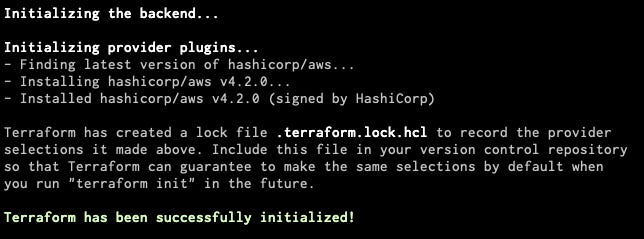
The next step is to run the below command. This command will download the AWS provider and initialize the current workspace to utilize terraform against AWS.
terraform initYou should see a message such as the below. Terraform pins provider versions using the terraform lock file so that you see a consistent experience across multiple initations of the module.
Next add the HCL configuration shown below to the main.tf file. This configuration is needed to create an ec2 instance. An AWS ec2 instance type is represented in Terraform using the resource moniker aws_instance. We specify bare minimum details required for creation of an ec2 instance such as ami and instance_type. app_server is a local reference to this ec2 instance. We could use this local reference in other parts of our module.
resource "aws_instance" "app_server" {ami = "ami-830c94e3"instance_type = "t2.micro"tags = {Name = "IntroToTFEc2Instance"}}Before we actually create the infrastructure in AWS, we can use the plan command to list the changes Terraform would make. Go ahead and type the command in the console window. This command provides a diff of changes against the configuration in HCL vs what actually exists in the state file in the workspace.
terraform plan
Once you are satisfied with the changes Terraform intends to make, run the below command to actually institute those changes against AWS.
terraform apply
When the above command completes running successfully, a new ec2 instance should have been created. You can check that using the aws ec2 console.
Thus, we have used the facilities of Terraform’s app tier to specify and create some infrastructure in AWS.
You can use the below command to delete any infrastructure that you have created so that costs don’t accumulate.
terraform destroy
Creating simple infrastructure is easy to do by writing local HCL modules. For creating complex infrastructure, one can depend on Terraform published modules. Some noble soul out there has gone through the pain of writing well-tested configuration templates and made them available. The use of published modules is beyond the scope of this article.
Circling back to the original theme of this article, this is what we have accomplished.
We have use Terraform CLI (Presentation Tier) to submit an infrastructure definition to the app tier.
The infrastructure definition is written in HCL, which the Terraform Core (Application Tier) understands.
Terraform core is augmented using Terraform providers. With the addition of each provider the capabilities of the Application Tier grow.
The application tier took over the responsibility of creating the infrastructure in AWS. Through HCL and Terraforms CLI, it completely abstracted away the complexities of interacting with AWS APIs.
The application Tier utilized a local backend to store the state files.
We have created infrastructure in this article using complete local setup. While, this setup works well for a hobbyist and a beginner. This setup does not scale when there are teams involved in managing infrastructure. In a subsequent article, we shall look at ways and means of expanding this setup so that it scales to teams of infrastructure engineers working at enterprise scale.
Happy Coding!